Studio Gets the Treatment – Part 2

This is the second of a two part post about my recent studio remodel and acoustic treatment. Read the first part here.

Once all the acoustic treatment was installed and the furniture was moved back in, I took another series of audio measurements. All my measurements are quasi-scientific, using materials I had on hand: a Max patch to generate test tones, a home-built omni mic, a spreadsheet. I only tested the frequency response for lower frequencies (20 Hz to approximately 350 Hz). I made no attempt to measure the reverberant response of the room (RT60). Given these limitations, the data nonetheless show a clear improvement in frequency response in the room.

Test Results

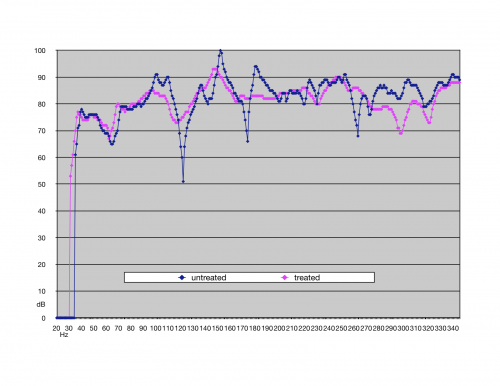
My goal was to flatten the frequency response of the room, knowing that a perfectly flat response isn’t practical given the dimensions of the room (or of my wallet). The chart above shows a range of approximately 50 dB in the untreated room, with the lowest reading of 51 dB at 122 Hz and the highest reading of 100 dB at 151 Hz. After the treatment was installed the range is approximately halved to 26 dB, from 67 dB at 62 Hz to to 93 dB at 148 Hz.

One unanticipated difference between the tests is the difference in low frequency readings. In the untreated room, my sound level meter registered nothing below 35 Hz. Once the room was treated, the meter picked up readings beginning at 31 Hz. This bass extension may be due to my ad hoc test equipment, but I seem to hear it.

Listening tests in the treated room were revelatory. Overall bass response is noticeably more even. Much more striking for me is how much the stereo imaging has improved in the treated room. The soundstage seems more defined and both wider and deeper. I’m shocked by how much improved even older stereo mixes sound in the treated room.

Listening to the Beatles “A Day in the Life” in the untreated room I felt like I heard the hard-panned mix just fine, despite some muddiness and boominess in the toms. In the treated room, the toms are clearer and more even, as expected, but even the hard-panned stereo image is more defined. Many tracks in the untreated room suffered from the “hole in the middle” syndrome, whereas in the treated room the sounds are more evenly distributed. I noted that Miles Davis’ “So What” seemed to have good imaging between the bass and trumpet in the untreated room. Listening to it with the acoustic treatment installed I can hear more than just the separation between the instruments–I can hear the sound of the room the instruments were recorded in.

Not Going Back

Remodeling my studio disrupted my work and schedule, but the results are well worth it. Even though it seems pedestrian to spend time and money on acoustic panels rather than boutique microphone preamps or the fashionable plugin du jour, I’ll continue to choose the former over the latter. I’ll never work in an untreated room again.

Studio Gets the Treatment – Part 1

One of my goals when I moved to Albany was to set up a good-sounding room for my studio. I had done enough recording in my previous spaces to realize that the biggest limiting factor for me to capture a good sound had become the acoustics of the room itself. Sure, I’d still love a boutique preamp and collection of the finest mics, but they can’t overcome the properties of physics at work in a poorly designed acoustical space.

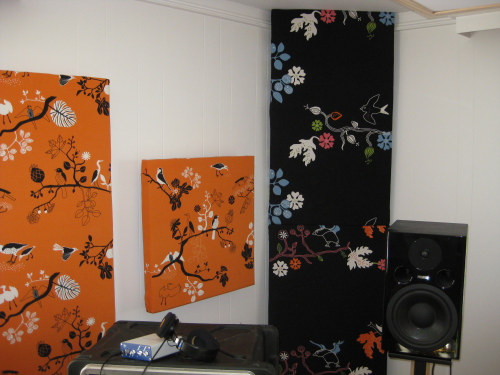
One corner of the finished studio, showing broadband absorbers mounted floor to ceiling (black) and two wall-mounted absorbers (orange). There's a glimpse of a white ceiling panel visible in the upper right corner.

My original plan was to treat my new studio before unpacking from our move, but there were more pressing renovation projects around the house: roof, kitchen, two baths, and nearly every other room but my studio. I also had various projects that required immediate work recording and editing sounds, so I unpacked and set up what I hoped would be a temporary studio.

Two years later I was still working in an untreated room, so I finally made a plan for the acoustic treatment I needed. I used Mitch Gallagher’s book Acoustic Design for the Home Studio as a starting point for my plans. Soon after, I began building some broadband absorbers. I followed the well-known technique of using rigid fiberglass panels–gift wrapping each one in funky, bright IKEA fabric chosen by my wife. The panels then languished in my basement for almost another year before I was able to pack away everything in the studio and clear the room for painting and installation.

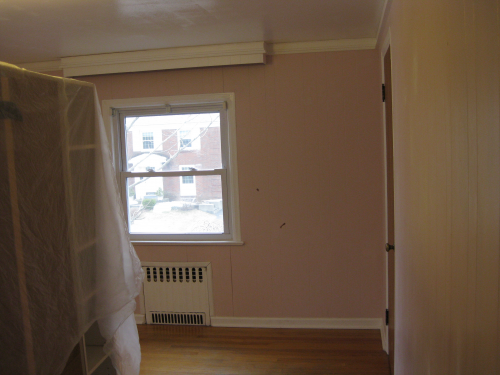
Bye-bye Pepto Bismol pink walls!

While the room was empty and untreated I took a series of audio measurements which confirmed the laws of physics–modes predicted by the dimensions of the room–and my own experience recording and mixing. I conducted a series of listening tests using familiar musical material. (More on these test results in Part 2.) Clapping in the empty room produced that characteristic boxy sound with fluttery echoes.

After installing only half of the wall panels I already noticed a significant difference in the sound of the room: now the echo I heard when clapping seemed to come from the hallway outside the room rather than the room itself. The broadband absorbers were clearly working.

Mounting the Panels

For wall-mounted panels I screwed eye hooks into drywall mounts which screwed easily by hand into the rigid fiberglass. With a little picture wire it was a simple matter to hang them from a nail in the wall. To increase bass absorption, I velcroed 2″ or 4″ spacers cut from scrap wood to the back of some of the panels.

For ceiling-mounted panels I built simple wooden frames that were hung from eye hooks mounted in the ceiling.


Back of the wall-mounted panels, showing the picture wire used for hanging.


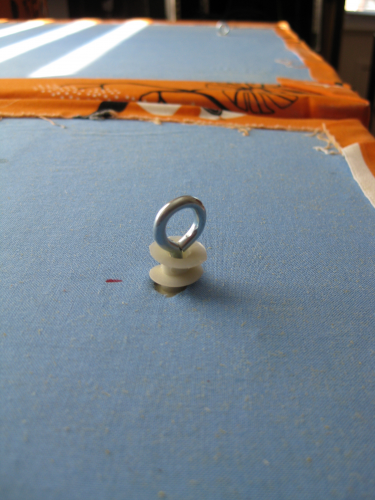
Detail of the nylon threaded drywall anchors used to secure eye-hooks to the backs of the panels


ASAC Presents DEEP FREEZE

The Albany Sonic Arts Collective presents their first concert of 2011 with performances by some of the Capital Region’s most exciting experimental musicians including Century Plants with Matt Weston, Holland Hopson, SoundBarn and Insect Posse.

DEEP FREEZE: Experimental Music for Snowy Times
Saturday, February 19
8:00 pm
Upstate Artists Guild
247 Lark St.
Albany NY
$5 suggested donation

This will be my first Albany show of 2011 and my last performance before heading to the Atlantic Center for the Arts for a residency with David Behrman (more on that later…). I’ll be performing a set of music for soprano sax and computer. My current plan includes a piece using a DIY plate reverb as the primary electronic sound source.

More about the artists after the jump…

Continue reading

Arduino On Board

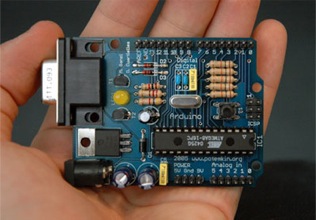
Photo by Nicholas Zambetti

I recently ordered an Arduino board to try another approach for getting sensor data into my computer. More and more of my students are using them, too, and I wanted some first-hand experience. Most of my previous work has been with the Basic Stamp family of boards. The Arduino arrived this week and I promptly sat down and gave it a try.

The first thing I noticed (aside from the price: the entire Arduino setup costs significantly less than similar boards!) was how much easier it was to get the Arduino going than the Stamp. This isn’t exactly a fair comparison, since my initial experience with Stamps was way back in 1999 or 2000, and it was also my first time fooling with microcontrollers. I’ve learned plenty since then, and the products (along with their attendant software) have come a long way. I have to give the nod to the Arduino for its cross-platform, open-source software. (When I first started with the Stamp I kept a junker 386 PC around, just to run the Stamp compiler. No fun.)

I’m also impressed by the Arduino software. I’ve admittedly done little more than fire up the example “sketches” and tweak a few lines of code. However, the Processing/Java-style language seems a better fit for my (weak) coding style. The community around the Arduino seems very active. There are already a number of projects that simplify moving data from the board to common software such as MaxMSP and Processing.

Then there’s also the luxury of the USB cable that serves for both communication and power supply. This may seem trivial, but I look forward to the day when I don’t need to change the battery in my sensor box before every performance, or carry a spare 9-volt wherever I go. I may also jettison my USB MIDI interface along with a MIDI cable required by my Stamp setup. Suddenly, though, my USB ports are getting a little crowded…

The one niggling worry I have is the serial communication with Max. Using MIDI is certainly slower, but seems foolproof to me: no handshaking necessary, a dead simple initialization process, etc. I hope my fears are simply due to a lack of experience; that once everything is setup and tested I’ll feel just as confident with the serial connection as I do with my aging MIDI cables.

Hemi Power

I wrote earlier about problems with the amps on my hemispherical speaker cutting out. After a little diagnostic work I realized the solution was simple–the amps weren’t getting enough juice. So I sprang for a heftier power supply (12 volt dc putting out 6 amps) and now everything runs hunky-dory. Can’t wait to take this puppy out to my next show! I’ve also been working out the kinks on some spatialization routines. More on that later…