DIY Concert Review

Edward Forstman reviewed the BAMA DIY concert for ArtsBham writing:

And, a new and wonderful discovery for this reviewer, Holland Hopson set his haunting vocals about a desolate landscape with “no road lead[ing] straight home” against layers of clawhammer banjo woven together via computer processing and a foot pedal.

BAMA DIY & DIT

Tomorrow I’ll be joining friends in the Birmingham Art Music Alliance for a DIY Composers Concert featuring composer/performers playing their own compositions. I’ll be performing music for banjo, live electronics and voice. Also on the program are Raphael Crystal and Gaines Brake, Monroe Golden, Kenneth Kuhn, Kyle McGucken and area newcomer Geni Skendo.

Tuesday August 9 7pm
BAMA “DIY” Concert
Unitarian Universalist Church of Birmingham
4300 Hampton Heights Dr
Birmingham AL 35209

DIY = Do It Yourself, of course
DIT = Do It Together (and in this case, Do It Tuesday)

The DIY orchestra of the future – hemi speakers

In this TED Talk Ge Wang of Stanford geeks out about computer music (hooray!). He talks briefly about the hemispherical speakers used by the Stanford Laptop Orchestra. Their design (using an IKEA salad bowl) informed my hemi speaker experiments here.

I recently bought a 6-channel amplifier to upgrade the 3 2-channel amps I originally installed in the speaker. I’ll post about the new amp as soon as I drop it in.

Favorite Music from 2011

My residency with David Behrman at the Atlantic Center for the Arts was an important part of 2011 and its effects trickled into the rest of (and best of) the year. I heard some great recordings as a result of the residency, namely:

Various Artists: Music for Merce (box set)
A massive collection that celebrates the musical legacy of the Merce Cunningham Dance Company. Great work by Christian Wolff, Pauline Oliveros, Takehisa Kosugi, Maryanne Amacher, John King, David Behrman and especially David Tudor. It’s astounding (and initially a little frustrating) that even with 10 CDs, many of the pieces are presented as excerpts. But hearing applause at the end of the live recordings reminds me that the pieces often lasted until the dance was over, and then they were over, too.

Ensemble vocal de Girokastër: Albanie – Polyphonies Vocales du Pays Lab
Mesmerizing choral music from Albania.

Otherwise, 2011 was the year of some exceptional music by many of my musician friends. Their work easily stands up against many of the releases from more established labels. In some cases, the work appears on established labels. In any case, the distinction between DIY and “signed artist” seems increasingly irrelevant. So I’m not hesitant to trumpet this work at all. I’m more concerned about leaving out some deserving recordings simply because there’s so much new material to consider. If we’re friends (I hope we are) and I don’t mention your work below, it’s probably because I haven’t listened to it yet. We’re still friends–I can’t wait to finally catch up on what you did in 2011 and hear what’s to come in 2012.

The Black Drumset: The Black Drumset
The crunchiest breakfast cereal.

Brent Fariss: Four Environments…Collapsing
Spooky action at a distance.

Matt Weston: The Last of the Six-Cylinders
A richly textured and surprisingly elegant electrified junkyard.

Jefferson Pitcher: Now the Deer
The quiet surface of a deep deep pool.

Bob Gluck / Joe Giardullo / Christopher Dean Sullivan: Something Quiet
My favorite kind of heterophony.

Here are a few other recordings that left their mark on my ears this year.

  • Various Artists: Music of Indonesia (multiple volumes) Daedalus Books has these on sale. I bought them all.
  • Michael Nyman: Decay Music
  • King Creosote and John Hopkins: Diamond Mine
  • Various Artists: The Friends of Old Time Music (box set)
  • Little Richard: The Georgia Peach
  • Kepler Quartet: Ben Johnston: String Quartets Nos. 2, 3, 4 & 9
  • Laura Viers: July Flame
  • Dave Douglas: Keystone

Studio Gets the Treatment – Part 2

This is the second of a two part post about my recent studio remodel and acoustic treatment. Read the first part here.

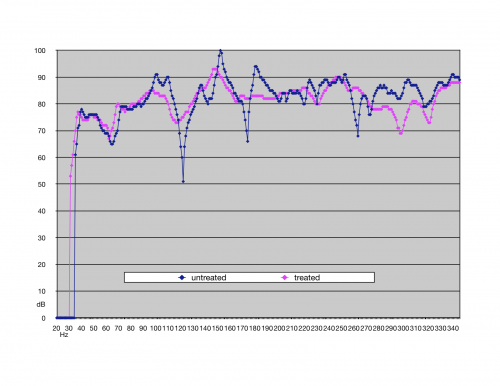
Once all the acoustic treatment was installed and the furniture was moved back in, I took another series of audio measurements. All my measurements are quasi-scientific, using materials I had on hand: a Max patch to generate test tones, a home-built omni mic, a spreadsheet. I only tested the frequency response for lower frequencies (20 Hz to approximately 350 Hz). I made no attempt to measure the reverberant response of the room (RT60). Given these limitations, the data nonetheless show a clear improvement in frequency response in the room.

Test Results

My goal was to flatten the frequency response of the room, knowing that a perfectly flat response isn’t practical given the dimensions of the room (or of my wallet). The chart above shows a range of approximately 50 dB in the untreated room, with the lowest reading of 51 dB at 122 Hz and the highest reading of 100 dB at 151 Hz. After the treatment was installed the range is approximately halved to 26 dB, from 67 dB at 62 Hz to to 93 dB at 148 Hz.

One unanticipated difference between the tests is the difference in low frequency readings. In the untreated room, my sound level meter registered nothing below 35 Hz. Once the room was treated, the meter picked up readings beginning at 31 Hz. This bass extension may be due to my ad hoc test equipment, but I seem to hear it.

Listening tests in the treated room were revelatory. Overall bass response is noticeably more even. Much more striking for me is how much the stereo imaging has improved in the treated room. The soundstage seems more defined and both wider and deeper. I’m shocked by how much improved even older stereo mixes sound in the treated room.

Listening to the Beatles “A Day in the Life” in the untreated room I felt like I heard the hard-panned mix just fine, despite some muddiness and boominess in the toms. In the treated room, the toms are clearer and more even, as expected, but even the hard-panned stereo image is more defined. Many tracks in the untreated room suffered from the “hole in the middle” syndrome, whereas in the treated room the sounds are more evenly distributed. I noted that Miles Davis’ “So What” seemed to have good imaging between the bass and trumpet in the untreated room. Listening to it with the acoustic treatment installed I can hear more than just the separation between the instruments–I can hear the sound of the room the instruments were recorded in.

Not Going Back

Remodeling my studio disrupted my work and schedule, but the results are well worth it. Even though it seems pedestrian to spend time and money on acoustic panels rather than boutique microphone preamps or the fashionable plugin du jour, I’ll continue to choose the former over the latter. I’ll never work in an untreated room again.

Studio Gets the Treatment – Part 1

One of my goals when I moved to Albany was to set up a good-sounding room for my studio. I had done enough recording in my previous spaces to realize that the biggest limiting factor for me to capture a good sound had become the acoustics of the room itself. Sure, I’d still love a boutique preamp and collection of the finest mics, but they can’t overcome the properties of physics at work in a poorly designed acoustical space.

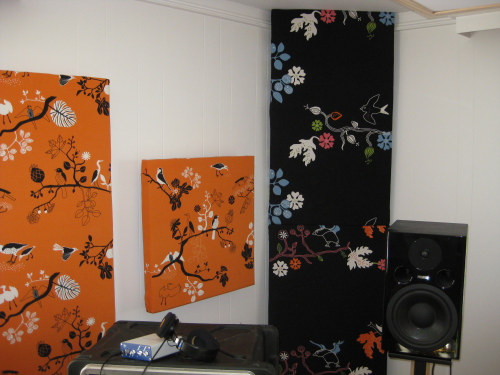
One corner of the finished studio, showing broadband absorbers mounted floor to ceiling (black) and two wall-mounted absorbers (orange). There's a glimpse of a white ceiling panel visible in the upper right corner.

My original plan was to treat my new studio before unpacking from our move, but there were more pressing renovation projects around the house: roof, kitchen, two baths, and nearly every other room but my studio. I also had various projects that required immediate work recording and editing sounds, so I unpacked and set up what I hoped would be a temporary studio.

Two years later I was still working in an untreated room, so I finally made a plan for the acoustic treatment I needed. I used Mitch Gallagher’s book Acoustic Design for the Home Studio as a starting point for my plans. Soon after, I began building some broadband absorbers. I followed the well-known technique of using rigid fiberglass panels–gift wrapping each one in funky, bright IKEA fabric chosen by my wife. The panels then languished in my basement for almost another year before I was able to pack away everything in the studio and clear the room for painting and installation.

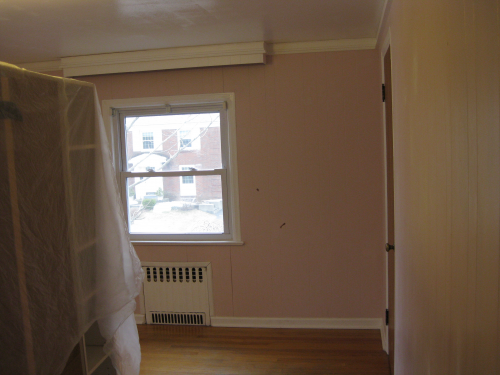
Bye-bye Pepto Bismol pink walls!

While the room was empty and untreated I took a series of audio measurements which confirmed the laws of physics–modes predicted by the dimensions of the room–and my own experience recording and mixing. I conducted a series of listening tests using familiar musical material. (More on these test results in Part 2.) Clapping in the empty room produced that characteristic boxy sound with fluttery echoes.

After installing only half of the wall panels I already noticed a significant difference in the sound of the room: now the echo I heard when clapping seemed to come from the hallway outside the room rather than the room itself. The broadband absorbers were clearly working.

Mounting the Panels

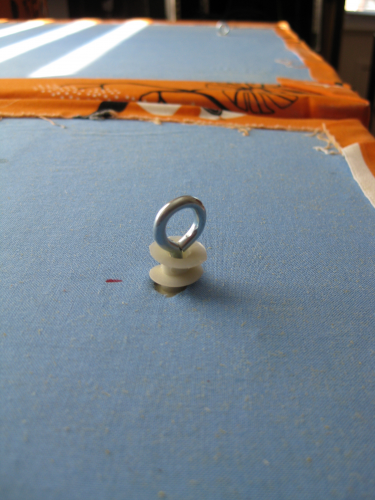
For wall-mounted panels I screwed eye hooks into drywall mounts which screwed easily by hand into the rigid fiberglass. With a little picture wire it was a simple matter to hang them from a nail in the wall. To increase bass absorption, I velcroed 2″ or 4″ spacers cut from scrap wood to the back of some of the panels.

For ceiling-mounted panels I built simple wooden frames that were hung from eye hooks mounted in the ceiling.


Back of the wall-mounted panels, showing the picture wire used for hanging.


Detail of the nylon threaded drywall anchors used to secure eye-hooks to the backs of the panels


Salad Bowl Hemi Speaker #2

I recently completed my second salad bowl hemi speaker. (See info on the first one here, including links to the Princeton and Stanford laptop orchestras which provided excellent guides to construction.) My second speaker followed the design and construction of the first very closely, with the substitution of Polk Audio DB401 speakers. The Polk speakers were significantly cheaper than the Infinity speakers. I haven’t directly compared the speakers, but I remember the Infinity speakers to be heavier and louder than the Polk speakers. The frequency response of both seems very similar. I do prefer the mounting tabs on the Infinity speakers to the broad flange on the Polk speakers. When mounting them on a hemispherical surface, the Polk speaker flanges don’t lie quite as flat (er…curved).

Here are some photos I took during construction.
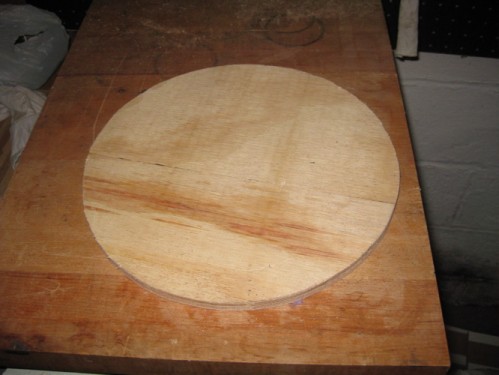

This is the bottom of the speaker. I simply scribed the circumference of the bowl on a piece of 1/2″ plywood and cut out the circle using a jigsaw.

Salad bowl with speaker holes marked and taped

Salad bowl with speaker holes marked and taped

Here’s the bowl with the position of each speaker marked and taped. If you look closely you can see a small red mark at the center of each circle. I used a string attached to the center of the bowl to mark the center of all the equatorial speakers. The tape is simply to prevent the bottom of my jigsaw from scarring the surface of the bowl.
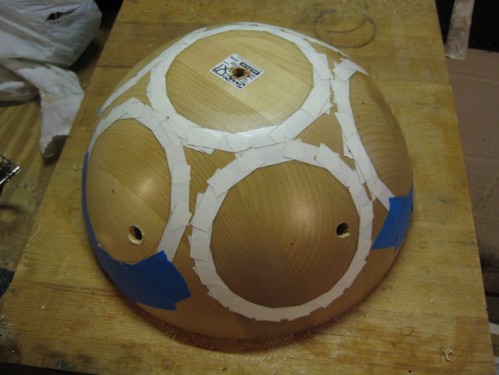
Salad bowl with holes drilled for jigsaw blade

Salad bowl with holes drilled for jigsaw blade

Next I drilled holes in each speaker cutout large enough to fit the blade of my jigsaw.
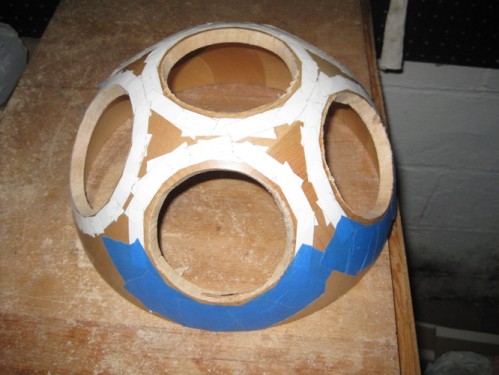
Salad bowl with speaker holes

Salad bowl with speaker holes

Here’s the bowl with all the speaker holes cut. It’s easy to crack the salad bowl after removing so much of the material, so take care with all subsequent drilling and cutting.
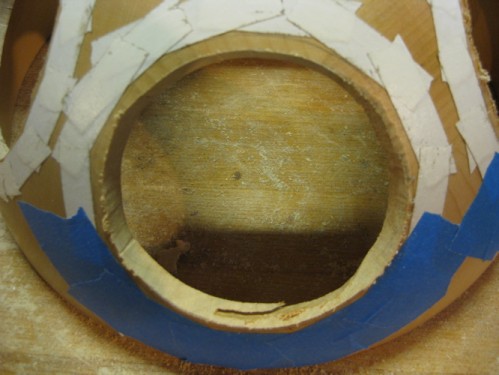
Detail of cut used to enlarge back of speaker opening

Detail of cut used to enlarge back of speaker opening

One result of working with the elliptical geometry of a hemisphere is that the back side of the holes we cut is slightly smaller than the front side. This might prevent your speakers from sitting flush against the surface. I only needed to trim a few places from the back of each circle to get the Infinity speakers to mount flush, but I had to cut the entire back edge of each opening in order to mount the Polk speakers.

Finished hemi showing knobs and connections

Finished hemi showing knobs and connections

Here’s the finished speaker. (I know, I skipped plenty of intervening steps! I was having too much fun putting all the pieces together to stop and take pictures.) The volume knobs (one for each stereo amp) are on the left. In the middle is the power connector. On the right is a 6-conductor Neutrik connector for all the audio signals.

Finished hemi on top of subwoofer

Finished hemi on top of subwoofer

A front view of the finished speaker. It’s sitting on top of a Sony subwoofer I picked up at a yard sale. The two together have a nice R2-unit look. I’ve set the crossover fairly high (around 300Hz). I expect I’ll back it down after some more listening tests.

I’ve already performed once with this hemi. So far, the biggest problem I’ve encountered is having the amps cut out on me when the input levels get too high. The Dayton amps seem to have a protection circuit that shuts them down when they’re driven too hard. It’s better than having the amps blow up, to be sure, but a bit of a drag having the audio suddenly drop out. Sending the low frequency signals to the sub seems to ease the load placed on the hemi amps. I’ve also been experimenting with limiters and high-ratio compressors, but I haven’t yet found the silver bullet. I’ve only scratched the surface of spatialization possibilities with this setup, and I’m looking forward to working with it even more.

One Month to the Mountain

Late Afternoon Cogs Heads Down, Photo by Jeff Glover

I’m headed to the top of Mt. Washington in about a month. I’ll be recording audio for an experimental documentary project led by Jacqueline Goss. At Jackie’s request I’ve been reading material on the history and operation of the Mt. Washington Observatory. I’m already having fun geeking out about cloud cover and wind speed and fog and rime.

Jacqueline Goss, from The 100th Undone

Still trying to figure out how to actually record usable sound in 50mph wind… I’m currently building a handful of DIY contact mics/hydrophones in anticipation of recording ice accumulation and the straining of various summit structures in full-on gales. I’m also building a few electret omni mics so I can have something to take outside with impunity in the worst conditions. I’ll try to post some photos of my homebrew audio projects. Also look for future reports and audio samples from the mountain top.

Retweeting. No, really.

A few months ago I blew a tweeter on one of my Fostex PM2 MkII monitors. What should have been a simple repair turned into a marathon. First, Fostex recently sold all support and distribution to a new US company who was slow to respond to repair inquiries due to the backlog created during the handover. They finally came through with a list of local(ish) authorized dealers/repair sites. The closest of which was a known and trusted music shop who never returned my calls–I guess they’re doing fine in this economy. So I struck out on my own. Given my limited budget, doing it myself seemed like the best approach anyway.

After a few consultations with the excellent tech team at iEAR, I had the tweeter removed, verified that it was indeed the problem, and gathered enough information to purchase replacements. I then headed over to Madisound to choose replacement tweeters. Support at Madisound was exemplary–a quick phone call yielded a handful of recommendations for replacement tweeters.

I opted for the SEAS Prestige 27TDF (H1211) tweeter. I’m no audiophile speaker-building veteran, nor could I reasonably measure the frequency response of the factory tweeters. So my choice was determined by finding the closest physical match of diaphragm size, outside diameter, etc. Oh, and budget was a concern, too. I could have spent more on tweeters than I paid for the monitors themselves. $33 each seemed about right. I bought two, realizing that the likelihood of a perfect match was slim–the goal was to replace both tweeters with acceptable sounding units.

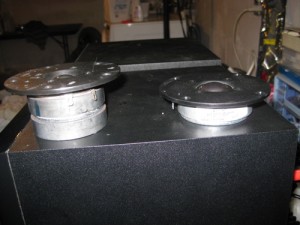
Old. vs. New. The factory tweeter is on the left. The SEAS replacement is on the right.

Old. vs. New. The factory tweeter is on the left. The SEAS replacement is on the right.

Installing the tweeters was mostly straightforward. I used my trusty dremel to carve out a little space in the opening for the new tweeters’ connectors. The only mystery was the polarity of the wires going to the tweeters. I connected the tweeter both ways and listened for differences. The correct wiring was readily apparent: upper mid frequencies all but disappeared when the polarity was reversed.

So, how do the new tweeters compare to the factory tweeters? On the whole, favorably. They’re noticeably quieter; I had to increase the tweeter gain by about 7 dB to get the new tweeter to match the factory unit. Their performance is less consistent at lower volume levels, with the lower range of the tweeter much less prominent when listening at lower volumes. But when I turn up the volume the response flattens out considerably and the difference between the tweeters becomes almost imperceptible. One reason I liked the Fostex monitors to begin with was their balanced sound at low listening levels. I’m disappointed to lose some of that clarity, but pleased that the speakers’ overall character is not radically changed when listening at more typical levels.

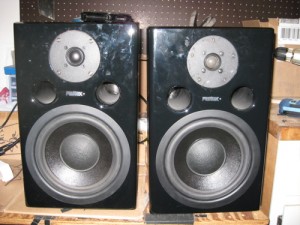
Here are the speakers on my workbench with a new tweeter installed on the left and the old one on the right.

Here are the speakers on my workbench with a new tweeter installed on the left and the old one on the right.

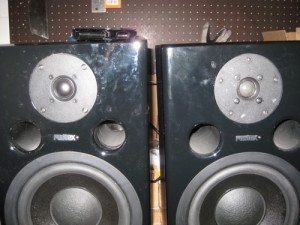
Close up shot showin the new tweeter on the left and the old one on the right.

Close up shot showing the new tweeter on the left and the old one on the right.

I’ve been listening and mixing with the retweeted speakers for about 10 days now and I feel like my old monitors are back in the studio.